
Ever wondered how to clean gas burner for high flame? Don’t worry, you’re on the right article. It is not something that you cannot do.
Here are some steps to clean your gas burner for high flame:
- First, remove the grates and burner caps from the stovetop.
- Then, using a non-abrasive cleaner and a sponge, wipe down the burners, removing any debris or grease buildup.
- If there are any stubborn stains, you can use a scrub brush or toothbrush to scrub the area gently.
- After cleaning, rinse the burners thoroughly with warm water and dry them completely before placing them back on the stovetop.
- Remember to clean the grates and burner caps before putting them back in place. By taking the time to clean your gas burner, you can ensure a consistent, safe, and efficient flame for your cooking needs.
To learn more on how to effectively clean your gas burner for high flame, keep reading.
Table of Contents
- How To Clean Gas Burner For High Flame
- How To Achieve A Higher Flame For Your Gas Burner For Cooking
- Conclusion
How To Clean Gas Burner For High Flame

Cleaning a gas burner to maintain a high flame involves a few simple steps. A clean burner ensures efficient combustion and better heat output.
Here’s a general guide to help you clean your gas burner for a high flame:
Materials Needed:
- Soft brush or toothbrush
- Mild dish soap or vinegar
- Warm water
- Baking soda (optional)
- Sponge or cloth
- Needle or pin
- Paper towels or clean clothes
Step-by-Step Instructions:
Step 1: Safety First
Before starting the process of cleaning, ensure that the gas supply to the burner is switched off completely.
This is of utmost importance to ensure your safety and prevent any accidental fire hazards. Prioritizing safety should always be your topmost concern when performing any maintenance tasks.
Step 2: Remove Grates and Burner Caps
To clean a gas stove thoroughly, it is necessary to remove the grates and burner caps. These parts can usually be easily lifted or removed by hand.
First, ensure that the stove has cooled down completely before beginning to remove any parts.
To remove the grates, lift them from the top of the stove and set them aside. For the burner caps, gently lift them from the burner heads and place them in a sink or basin of warm, soapy water.
Remember to dry all parts completely before reassembling the stove.
Step 3: Brush Away Debris
To keep your burner grates and caps clean, start by using a soft brush or toothbrush to gently scrub away any loose debris, food particles, and burnt residue.
It’s important to pay attention to the small holes or openings where the gas flames come out, as they can become clogged over time and affect the efficiency of your burners.
Use a pointed object, such as a toothpick, to clear out any debris from these openings.
If the buildup is particularly stubborn, you can soak the grates and caps in warm, soapy water before scrubbing them again.
Always make sure to dry the parts thoroughly before reassembling them.
Step 4: Soak in Soapy Water
To clean your stove’s burner grates and caps, start by filling a sink or basin with warm water.
Add some drops of mild dish soap or vinegar to the water and stir it well. Place the burner grates and caps in the soapy water and let them soak for 15-30 minutes.
The warm water and soap will help to loosen stubborn grease and grime, making it easier to clean.
After soaking, use a non-abrasive scrubber or a sponge to gently scrub the grates and caps to remove any remaining dirt or residue.
Rinse the grates and caps with clean water and dry them thoroughly with a clean towel before placing them back on the stove.
Step 5: Scrub
After soaking, use a sponge or cloth to scrub the grates and caps. For tougher stains, you can make a paste of baking soda and water and gently scrub with it. Baking soda can help to lift stains and stuck-on residue.
Step 6: Clean Vent Openings
Use a toothpick or a small wire to carefully clean any vent openings or small holes in the burner. These can get clogged with grease and debris, affecting the flame quality.
Step 7: Clean the Burner Surface
To clean your burner effectively, it is important to determine if the surface is removable or not.
If it is removable, gently take it out and wash it with warm soapy water. Make sure to clean all the nooks and crannies thoroughly.
For non-removable surfaces, use a damp cloth to wipe it down. Be cautious not to use excess moisture, especially near any ignition components, to avoid electrical hazards.
After cleaning, dry the surface completely before placing it back to avoid corrosion or damage.
Step 8: Clean the Igniter
When using a burner with an electric ignition, it’s crucial to be careful not to get the ignition components wet.
To clean around the igniter, you can use a dry toothbrush or compressed air to ensure it is free from any debris.
It’s essential to avoid using water or any other liquid cleaning agents on the ignition components, as this can cause damage to the electric ignition system.
By taking these precautions, you can help keep your burner’s electric ignition system in good working order and avoid any potential safety hazards.
Step 9: Clean Burner Base
Before beginning the cleaning process, it’s important to disconnect the gas supply and turn off the burners.
Once you’ve done that, remove the grates and caps and soak them in warm soapy water. While they’re soaking, take a damp cloth and gently clean the burner base.
Be sure to avoid getting any water into the gas ports or openings, as this can cause damage to the burners.
Taking these precautions will ensure a thorough and safe cleaning of your stovetop.
Step 10: Clean Gas Ports
If you notice that the flames on your gas stove burners are uneven, it could be an indication that the small gas ports on the burners are clogged.
To resolve this issue, you can try using a needle or pin to carefully unclog the ports.
Food particles or debris can easily accumulate in these tiny holes over time, which can affect the flow of gas and lead to uneven flames. To clear the clogged ports, gently poke them with a needle or pin.
Be sure to do this carefully to avoid damaging the ports or injuring yourself. Once you have unclogged the ports, test the burners to ensure that the flames are now even.
Step 11: Rinse and Dry
Rinse the grates and caps thoroughly to remove any soap or cleaning solution residue. Allow them to air dry completely before putting them back on the stove.
Step 12: Reassemble
Once everything is dry, reassemble the burner caps and grates onto the stove.
Step 13: Check for Proper Alignment
Ensure that the burner caps and grates are properly aligned and sitting securely on the burners. Misaligned parts can affect flame distribution.
Step 14: Test the Flame
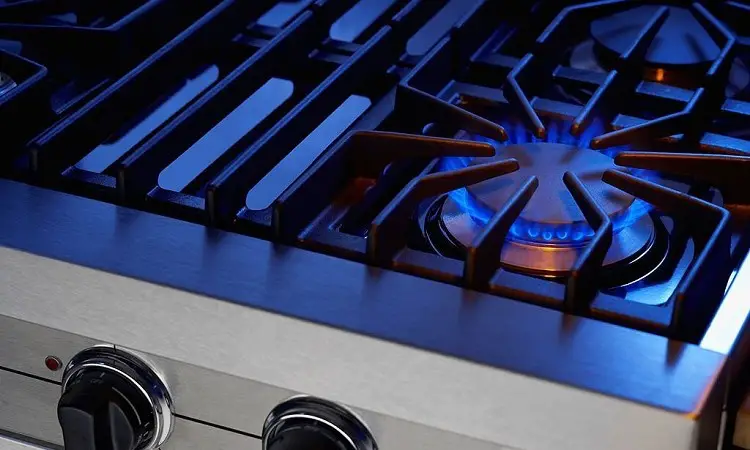
Turn on the gas supply and ignite the burner. Check the flame to ensure it’s even and blue. A yellow or orange flame indicates incomplete combustion and might require further cleaning.
Regular Maintenance
To maintain a high flame, perform this cleaning process regularly, depending on how frequently you use your stove.
Cleaning every few weeks or as needed will prevent buildup and keep your burner working efficiently.
Remember that the specifics can vary depending on the type and model of your gas burner, so always consult your appliance’s manual for any manufacturer-recommended cleaning methods.
How To Achieve A Higher Flame For Your Gas Burner For Cooking
If you’re looking to achieve a higher flame on your gas burner for cooking, there are a few things you can do to optimize its performance:
Clean the Burner: A clean burner allows for better airflow and gas distribution, resulting in a stronger flame. Follow the cleaning steps mentioned in the previous response to ensure your burner is free from debris and buildup.
Adjust the Air Intake: Some gas burners have adjustable air intakes, which can affect the flame size. Check if your burner has this feature and adjust it according to your stove’s manual to achieve a larger flame.
Check Gas Pressure: Insufficient gas pressure can lead to weak flames. If you suspect low gas pressure, contact a professional to inspect and adjust it if necessary.
Use Proper Cookware: Make sure you’re using cookware with a flat and even bottom. Warped or uneven pots and pans can cause flames to be uneven and inefficient.
Position Cookware Correctly: Ensure that your cookware is centered over the burner, placing the cookware off-center can lead to uneven heating and smaller flames.
Use High Heat Setting: Most stoves have different heat settings (low, medium, high). Make sure you’re using the highest heat setting available to get the maximum flame.
Use a Smaller Pot/Pan: If you’re using a large pot or pan on a small burner, the flames might not be as intense. Opt for appropriately sized cookware that matches the burner size.
Use a Wok Ring: If you’re using a wok, consider using a wok ring to position the wok closer to the flame, which can result in higher heat.
Consider Burner Maintenance: Over time, burner components can wear out or become less efficient. If you’ve tried all the above steps and still have trouble getting a high flame, you might need to replace worn-out burner parts.
Consult the Manual: Always refer to your stove’s user manual for specific instructions on achieving the desired flame height. Some stoves might have safety features.
You May Also Read:
Conclusion
I am sure that you now know how to clean gas burner for high flame right? And you can see it is not a tedious task.
Cleaning a gas burner to maintain a high flame involves a few simple steps and it is something you can achieve in a jiffy should you have the right materials and a good knowledge of the process of cleaning.
Remember that a clean burner ensures efficient combustion and better heat output so if you want to enjoy efficient combustion and better heat output while cooking, then you have got to keep your burner clean.
